Polk Cobra De-enamelling and termination
Polk Cobra de-enameling and termination
Here is a short write-up on experience de-enameling and termination Polk Cobra cables. Please note again that the enamel is TOXIC. Mr Arthur Salvatore published an earlier version on his website.
Working with Polk Audio Cobra Cables: A novice’s journey
My experiences with these cables: what works and what did not.
Remember:
The individual strands of these cables look thick with their insulation on.
Once you remove insulation, you will be surprised to note that the copper
strands are really thin (like fine wire). If you have not done so, please read
Mr Arthur Salvatore’s column before you go on.
Method 1: Mechanical scraping of the insulation.
Yes
it works but it is very time consuming. I found that the best method was to
pull a few strands at a time between two sheets of fine-grain sand paper. You
have to keep turning the cables around so that all the enamel is scraped off by
the sand paper. Very time consuming because of the large number of strands.
Mechanical
methods that are not that effective are listed below.
·
Scraping
with metal file. The fine strands tend to break off.
·
Using
a sander/grinder. Even careful application of pressure and selection of soft
grinding surfaces causes some cables to break off.
·
Metal
scraping tool. No good. Too many strands break off.
After
removal of enamel, it is important to solder the exposed copper immediately.
Please do remember that we are working with 30 year old copper wire. It is
still usable due to the purity of the copper and the excellent protection of
the enamel. Avoid exposure, as much as you can.
Method 2: Burning off the enamel with fire (lighter)
Not
workable in real life.
·
The
intense heat of the enamel burning burns off the copper wire. Please note that
the enamel thickness is much higher than the cable diameter. You end up with
different lengths of burned up cable ends.
·
To
make it worse, the copper gets oxidized by the fire/heat.
Method 3: Chemical stripping
Theoretically
this is a good technique, but quite difficult in real life.
·
The
tight Litz braiding and the close fitting plastic sleeve has a tendency to
absorb the solvent from the stripping chemical by capillary action. I found
that even holding the cable vertically and dipping it into the stripping
solution from above does not prevent capillary action. I destroyed 1 m of my
cable trying this method.
·
The
copper quality (purity) may be compromised by the stripping solution.
Method 4: High Temperature Solder pot
Best
of the four methods I have tried.
1.
Use
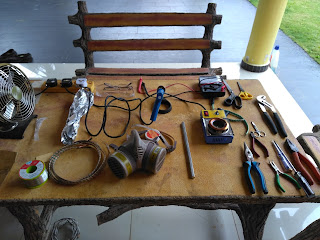
a high temperature solder pot (temperature about 400oC)
2.
Melt
enough solder to be able to dip (about 1.5 cm deep) the required length of
cable.
3.
Wait
till temperature reaches 380oC-420oC.
4.
Dip
the cut end of the cable in the melted solder and wait till the enamel burns off.
You can see the white fumes (and nasty smell if you do not wear PPE),
indicating the enamel is burned off. Takes only a 10-20 seconds if the solder
is hot enough. Slowly move the cable back and forth so that all strands are
de-enamelled.
·
Separate
the strands by color twist them together lightly. This will make dipping them
in solder easier. Ensure no mixed strands (a single mixed strand out of 144 will
short your cable)
·
This
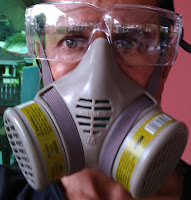
white gas is toxic. Wear a chemical grade mask (dust mask such as N95 is not
good enough). Do this is a well-ventilated area
·
Use
a long plier or similar to hold the cable. Does not hold the wire with bare
hands as you burn off the enamel. It can become very hot.
·
Protect
the rest of the wire from the extreme heat by wrapping the cable (just above
the section to be dipped) with a thick layer of aluminium foil to conduct away
the heat. Or use holders with heat sink.
·
If
it takes too long, the solder pot is not hot enough. If the solder is too hot,
the copper wire will melt. If you are doing this the first time, cut off a couple
of strands and test.
5.
If
necessary, apply solder paste and dip in solder momentarily.
6.
If
you plan to terminate using connectors, prepare them ahead and assemble them
straight out of the solder pot.
Good
luck and happy listening.
To
all the brave souls who would to attempt this: these cables are really worth investment
in money and time.
Note:
Arthur Salvatore noted that the enamel can also be burned off using a
high-temperature soldering iron. The results are not pretty due to large number
of strands but it works too. I have not tried this method but others have done
this successfully. After you burned off the enamel, bunch the cables together
and solder the ends.
 |
| Chemical grade mask and goggles are COMPULSORY! |

Comments
Post a Comment
Thank you for taking time to share your experience and comments. Appreciate it.